
この記事は認証認可アドベントカレンダー の6日目の記事です。
動機: やっぱ OIDC ネタと FIDO ネタが多いから、どっちも絡めたやつを書けばめっちゃウケるのでは?
→ Azure AD B2C に WebAuthn によるパスワードレス サインインを実装するサンプルあったなあ…
と、苦し紛れにネタをひねり出した結果、くっそニッチな記事になってしまった。
改めて読み直してみても、テーマを Azure B2C にしてしまったことで B2C を触ったことある人で、かつ FIDO に興味ある人という、 読者 を狭めてしまっている が、頑張って書いたのでもし全部試したという酔狂な人が (ふじえさん以外で) 居たらフィードバックヨロ。
Azure AD B2C
Azure AD B2C とは、Twitter や Facebook, その他の OpenID Provider を統合し、Azure AD B2C 独自の Id Token, Access Token を発行することが出来る。要は Auth0 的なサービス。(本ブログ二度目)
組み込みポリシーと呼ばれる既定のプロファイルで、複数の IdP と接続して、サインインフローを作れる。
OIDC のプロバイダーを接続するときのクセが強かったりするのだが、カスタム プロバイダーを追加することで、外部の OP を接続できるし、デフォルトの機能も最低限必要なものはそろってる。
のだが、複雑なビジネスロジックを組み込もうとすると、カスタム ポリシーを弄ることになる。
注意
あらかじめ注意をしておくと、カスタム ポリシーを弄るのはかなりつらい作業で、メンテナンスも大変なのでできることなら組み込みのポリシーを利用することを 強くオススメする。
B2C のカスタム ポリシーはマジでなんでも出来てしまうので、中身がわかってないとなぜ動かないのか全くわからなくなる。
公式ドキュメント にも、こう書いてある。
ID のプロフェッショナル、システム インテグレータ、コンサルタント、社内の ID チーム。 彼らは OpenID Connect のフローに慣れており、ID プロバイダーや要求ベースの認証を理解しています。
注: Azure Active Directory B2C で、カスタム ポリシーは、主に、複雑なシナリオに取り組む用途向けに設計されています。
ほとんどのシナリオで、組み込みユーザー フローを使用することをお勧めします。
意訳: ID のプロフェッショナル以外は使うな
個人的な意見を追加するなら、ID だけでなく XML のプロフェッショナルである必要があると思う。
また、本記事ではカスタム ポリシーのチュートリアルについては解説しない。
各自公式ドキュメント等で確認してほしい。
カスタム ポリシー
カスタム ポリシーとは何ぞや。
Azure AD B2C は、ソーシャルアカウントと連携し、Azure AD B2C 独自の Id Token, Access Token を発行することが出来る。
その際各種 IdP と claim のやり取りを行い、検証し、変換し、任意のクレームを構築し、最終的にトークンを払い出す。
その際には様々なデータが入力される。
ユーザーの入力ID/パスワードであったり、ニックネーム、他の IdP から返却されるトークンかもしれない。
それらの入力から claim を取り出し、変換したり、外部 API で Validation したりして、最終的にトークンを作成し B2C の秘密鍵で署名するのが Azure B2C のキモ。
この claim の変換規則や、保存先、ユーザーの入力フォーム、それらのすべてを自由にカスタマイズできるのが、カスタム ポリシーである。
そして設定は すべて XML に保存されている。
そう…… XML に保存されているのだ。
サンプルを動かすのに必要な知識は、 以下のブログにまとめられていて、実際に一つのサンプルを動かしてみたのが、今回の記事である。
今回動かすサンプル
今回動かすサンプルはこちら。
Sign-in with FIDO authenticator
https://github.com/azure-ad-b2c/samples/tree/master/policies/fido2
ID/Password でサインインするユーザーに、FIDO2 の Authenticator でサインインするフローを追加するもの。
最終的な動きはこんな感じ。
初期登録して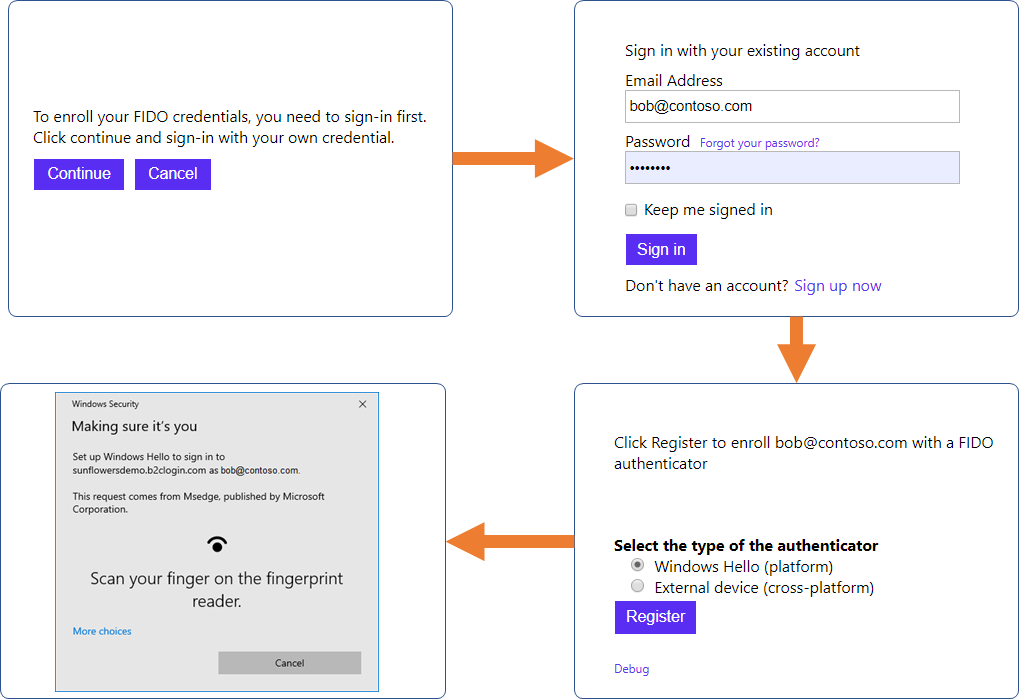
認証する。
事前準備
残念ながら、このポリシー、これだけでは動かない。
まずはカスタム ポリシーの starterpack を構成する必要がある。
https://github.com/Azure-Samples/active-directory-b2c-custom-policy-starterpack
幸いカスタム ポリシーの導入はドキュメントがあるので、その通りに構成すればサインインフローができるはず。
カスタム ポリシーの概要 - Azure Active Directory B2C | Microsoft Docs
https://docs.microsoft.com/ja-jp/azure/active-directory-b2c/active-directory-b2c-get-started-custom?tabs=applications
たいていの人はここで XML を見て昇天する。心を強く持ってほしい。
XML の編集は Azure AD B2C の VS Code 拡張 を入れると、少しは楽になる。
是非入れよう。
FIDO2 のカスタムポリシー
さて、事前準備を突破してしまったら、追加のポリシーを設定していく。
サンプル には、認証のコアとなる要求クレームや API コールが定義された FIDOExtensions.xml と、ユーザーが実際にアクセスするフローを定義した FIDORegistration.xml と FIDOSignUpOrSignin.xml がある。
詳しくは ief-wiki などを参照して欲しいが、カスタム ポリシーの XML は先ほど作成した TrustFrameworkBase.xml を継承して、拡張属性などを定義する。最終的に継承された Extension の内容すべてを統合して、B2C のポリシーが完成する。
IEF は dentity Experience Framework の略
今回の場合は TrustFrameworkBase.xml > TrustFrameworkExtensions > FIDOExtensions.xml と継承されている。FIDORegistration.xml と FIDOSignUpOrSignin.xml は、継承され統合された FIDOExtensions.xml を参照する。
FIDOExtensions.xml に定義されていない設定は、継承元のどこかに記述されているはずなので、気力があれば継承元のポリシーを覗いてみよう。
今回は FIDOExtensions.xml のみを編集する。ただし、編集する前に事前準備が必要なので順にやっていく。
事前準備 1. FIDO2 サーバーの作成
まずはバックエンドに使う FIDO2 サーバーのサンプルを動かそう。
このサンプルでは、FIDO2 のサーバー部分は以下のサンプルを流用している。
https://github.com/MicrosoftEdge/webauthnsample
もともとは HTML も含めたサインアップ/サインインのサンプルだが、ウェブの画面は利用せずに、API だけ利用する。
ホントは Azure Function とかに載せようとしたけど使い方わからなくて断念。
Azure AppService とかも使ったことないので、now.sh にデプロイした。
注意点としては、最終的に WebAuthn が動くのは B2C のログイン画面、つまり https://yourtenant.b2clogin.com 上なので、rpId も yourtenant.b2clogin.com にしなければならないこと。
- fido.js ファイル内の以下の部分を修正する
- const hostname = process.env.HOSTNAME || "localhost";
+ const hostname = "yourtenant.b2clogin.com";
now.sh にデプロイするために、now.json を以下のように作成する。
後は、npm install -g now して now でデプロイ完了。

now.sh が v2 にバージョンアップしていて困ったが Now でクラウドの複雑さから解放されよう、今すぐに - Qiita あたりを参考にした
https://source-code.username.now.sh とかでデプロイされるので https://source-code.username.now.sh/challenge にブラウザでアクセスしてチャレンジが返れば OK。
URL は後で使うのでメモっておく。
なお、後述するユーザーデータの保存先の関係上、WebAuthn の sign count はチェックしていない。
事前準備 2. 静的ファイルのホスト
WebAuthn のキーを登録/認証するための、カスタム サインインページのための静的 HTML をアップロードする。
Azure B2C では外部の HTML テンプレートを JavaScript でフェッチして、必要なフォームを埋め込んで表示する。
今回は、カスタム HTML 上で Authenticator からのレスポンスをフォームに詰めて、次のフローに流す。
適当に gist でも GitHub のリポジトリでも CORS が許可されている場所であればどこでも適当にアップロードにしていい。
https://gist.githubusercontent.com/watahani/f94a8362a4cc075a67254eb403c9c1c7/raw/e83697aa603d0c11b78d9f503b4885ac84695601/self-asserted.html
https://gist.githubusercontent.com/watahani/a49bec0c38ad1e2540b829ee4121d8ba/raw/dc5eaa4c36b80459980eae312861fac7339b269c/welcome.html
URL は後で使うのでメモっておく。
事前準備 3. アプリの登録
サンプルでは WebAuthn の Credential ID と公開鍵などを保存するアプリを作成している。
アプリケーションに Credential ID を保存する関係上、ユーザーは 1 つの Credential しか保存できない。
本来別途 DB を用意して、ユーザーと公開鍵を保存すべきだが、Application Extension (拡張プロパティ) に保存している。
Custom Policy の練習のためにこうなってるのだと言い聞かせて、設定を進める。
- Azure Active Directory B2C でカスタム ポリシーに独自の属性を追加する | Microsoft Docs
https://docs.microsoft.com/ja-jp/azure/active-directory-b2c/active-directory-b2c-create-custom-attributes-profile-edit-custom
何をやっているか簡単に説明すると、ユーザー属性を保存 & 読み書きするアプリケーションを作成し、カスタムポリシー内で WebAuthn の情報を保存できるようにしている。
アプリの登録で登録する。アプリの名前は WebApp-GraphAPI-FIDO2-Extensions とした。
画面はこんな感じ。
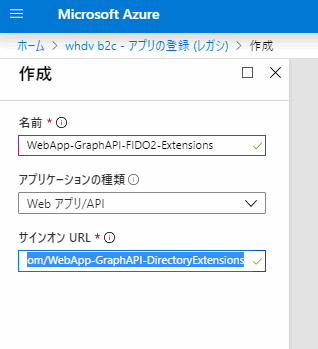
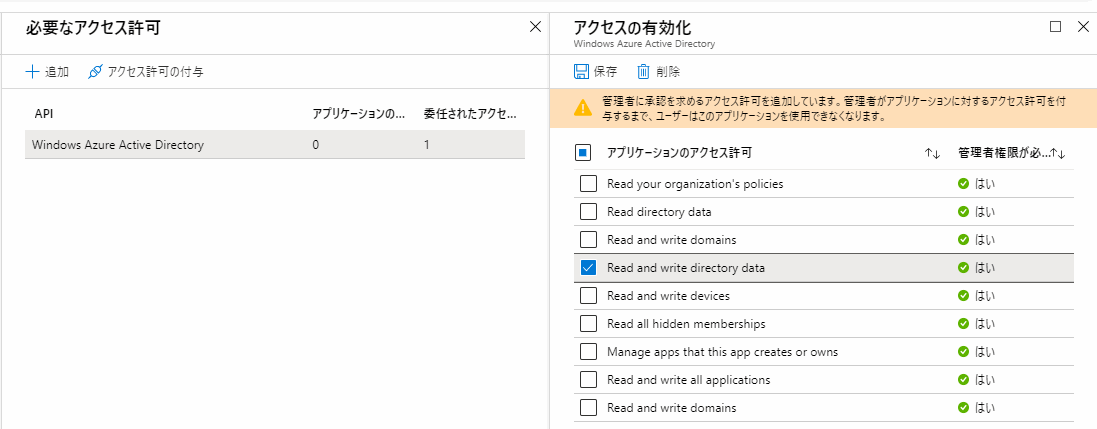
Admin Consent を完了させる。
で作成したアプリのオブジェクト ID と アプリケーション ID をメモっておく。
FIDOExtensions.xml の編集
ここまでの手順を完了した酔狂な人がいた場合、以下のような状態になっているはずである。
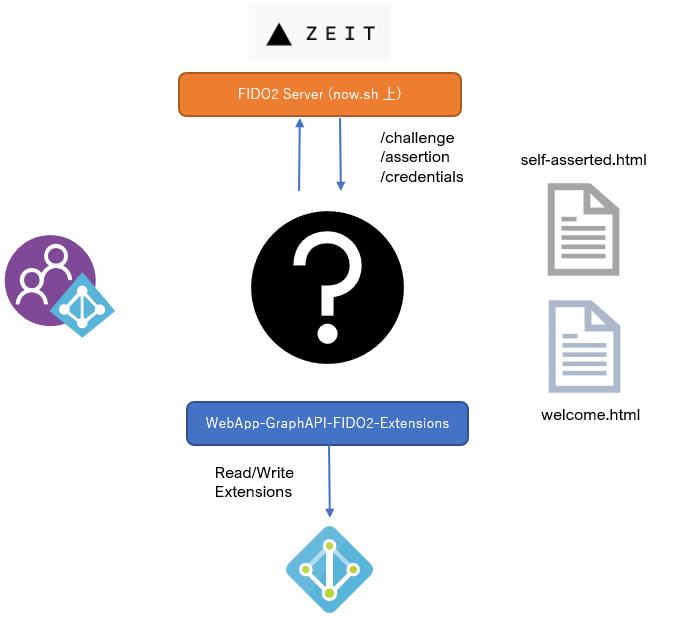
この細切れのコンポーネントを、FIDOExtensions.xml でつないでいく。XML で…。
UserJourneys
どんどん認証認可の話が関係なってきているが、先に進みます。
ユーザーのフローについては、UserJourneys と呼ばれるタグに定義されており、UserJourneys は大抵 Extensions か、SignInSignUp の定義ファイルにある。
今回は FIDORegistration.xml を軽く (?) みていく。あくまで軽くね。
  <UserJourneys>
    <UserJourney Id="FIDO-Registration">
      <OrchestrationSteps>
        <!--Sample: Present the enrollment welcome screen-->
        <OrchestrationStep Order="1" Type="ClaimsExchange">
          <ClaimsExchanges>
            <ClaimsExchange Id="SelfAsserted-EnrollmentWelcome" TechnicalProfileReferenceId="SelfAsserted-FIDOEnrollmentWelcome" />
          </ClaimsExchanges>
        </OrchestrationStep>
        <OrchestrationStep Order="2" Type="CombinedSignInAndSignUp" ContentDefinitionReferenceId="api.signuporsignin">
          <ClaimsProviderSelections>
            <ClaimsProviderSelection ValidationClaimsExchangeId="LocalAccountSigninEmailExchange" />
          </ClaimsProviderSelections>
          <ClaimsExchanges>
            <ClaimsExchange Id="LocalAccountSigninEmailExchange" TechnicalProfileReferenceId="SelfAsserted-LocalAccountSignin-Email" />
          </ClaimsExchanges>
        </OrchestrationStep>
        <!-- Check if the user has selected to sign in using one of the social providers -->
        <OrchestrationStep Order="3" Type="ClaimsExchange">
          <Preconditions>
            <Precondition Type="ClaimsExist" ExecuteActionsIf="true">
              <Value>objectId</Value>
              <Action>SkipThisOrchestrationStep</Action>
            </Precondition>
          </Preconditions>
          <ClaimsExchanges>
            <ClaimsExchange Id="SignUpWithLogonEmailExchange" TechnicalProfileReferenceId="LocalAccountSignUpWithLogonEmail" />
          </ClaimsExchanges>
        </OrchestrationStep>
        <!-- This step reads any user attributes that we may not have received when authenticating using ESTS so they can be sent
          in the token. -->
        <OrchestrationStep Order="4" Type="ClaimsExchange">
          <ClaimsExchanges>
            <ClaimsExchange Id="AADUserReadWithObjectId" TechnicalProfileReferenceId="AAD-UserReadUsingObjectId" />
          </ClaimsExchanges>
        </OrchestrationStep>
        <!--Sample: FIDO get a FIDO challenge value from the REST API service-->
        <OrchestrationStep Order="5" Type="ClaimsExchange">
          <ClaimsExchanges>
            <ClaimsExchange Id="REST-FIDOGetChallenge" TechnicalProfileReferenceId="REST-FIDOGetChallenge" />
          </ClaimsExchanges>
        </OrchestrationStep>
        <!--Sample: FIDO enrollment step-->
        <OrchestrationStep Order="6" Type="ClaimsExchange">
          <ClaimsExchanges>
            <ClaimsExchange Id="SelfAsserted-Enrollment" TechnicalProfileReferenceId="SelfAsserted-FIDOEnrollment" />
          </ClaimsExchanges>
        </OrchestrationStep>
        <!--Sample: FIDO enrollment persist data-->
        <OrchestrationStep Order="7" Type="ClaimsExchange">
          <ClaimsExchanges>
            <ClaimsExchange Id="AAD-UserWriteFidoUsingObjectId" TechnicalProfileReferenceId="AAD-UserWriteFidoUsingObjectId" />
          </ClaimsExchanges>
        </OrchestrationStep>
        <OrchestrationStep Order="8" Type="SendClaims" CpimIssuerTechnicalProfileReferenceId="JwtIssuer" />
      </OrchestrationSteps>
      <ClientDefinition ReferenceId="DefaultWeb" />
    </UserJourney>
  </UserJourneys>
OrchestrationStep の 1 ~ 4 までは通常の認証フローなので今回はスキップ。
いつか解説記事を書けたらかくかも。
5 が API のアクセスを実行する部分。
<OrchestrationStep Order="5" Type="ClaimsExchange">
  <ClaimsExchanges>
    <ClaimsExchange Id="REST-FIDOGetChallenge" TechnicalProfileReferenceId="REST-FIDOGetChallenge" />
  </ClaimsExchanges>
</OrchestrationStep>
TechnicalProfileReferenceId に REST-FIDOGetChallenge" とあるので、FIDOExtensions.xml の該当する部分を確認すると。
<TechnicalProfile Id="REST-FIDOGetChallenge">
  <DisplayName>GET a FIDO Challenge</DisplayName>
  <Protocol Name="Proprietary" Handler="Web.TPEngine.Providers.RestfulProvider, Web.TPEngine, Version=1.0.0.0, Culture=neutral, PublicKeyToken=null" />
  <Metadata>
    <Item Key="ServiceUrl">https://yoursite.azurewebsites.net/challenge</Item>
    <Item Key="AuthenticationType">None</Item>
    <Item Key="SendClaimsIn">QueryString</Item>
    <!-- Remove in Production-->
    <Item Key="AllowInsecureAuthInProduction">true</Item>
  </Metadata>
  <OutputClaims>
    <OutputClaim ClaimTypeReferenceId="challenge" PartnerClaimType="result" />
    <!--Sample: Set the identity provider name to FIDO-->
    <OutputClaim ClaimTypeReferenceId="identityProvider" DefaultValue="fido" AlwaysUseDefaultValue="true" />
  </OutputClaims>
  <UseTechnicalProfileForSessionManagement ReferenceId="SM-Noop" />
</TechnicalProfile>
これが TechnicalProfile です!
このようにAPI をコールして Challenge を取得していることが分かりますね!!
Protocol タグに Handler="Web.TPEngine.Providers.RestfulProvider, Web.TPEngine, Version=1.0.0.0, Culture=neutral, PublicKeyToken=null" と指定があるので、たしかに Rest API ですね!!!
さて、API のエンドポイントが https://yoursite.azurewebsites.net/challenge になっているので、今回 now.sh 上に構築したエンドポイントに変更。
この並びに WebAuthn の Assertion と Attestation 他の API もついでに編集しておく。
蛇足ですが、サンプルの FIDO サーバーが古いので、バックエンドの API が /credentials と /assertion になっているが、今なら Server Requirements and Transport Binding Profile に準拠するようにエンドポイント名は編集したほうがいいだろう。
となると XML 部分も直さないといけないし、そもそも B2C で引き回せるクレームとしてどの程度のデータ量が行けるかはよくわかってない。
やっぱ普通にサーバーへの認証部分は外部に丸投げしてしまって、ユーザー ID と Authenticator のレスポンスぐらい投げたら True, False が返ってくるぐらい外部のサーバーを作りこんどいたほうが取り回しは楽そう。
まああくまでサンプルです。
<TechnicalProfile Id="REST-FIDOMakeCredential">
  <DisplayName>GET a FIDO Challenge</DisplayName>
  <Protocol Name="Proprietary" Handler="Web.TPEngine.Providers.RestfulProvider, Web.TPEngine, Version=1.0.0.0, Culture=neutral, PublicKeyToken=null" />
  <Metadata>
    <Item Key="ServiceUrl">https://yoursite.azurewebsites.net/credentials</Item>
    <Item Key="AuthenticationType">None</Item>
    <Item Key="SendClaimsIn">Body</Item>
    <!-- Remove in Production-->
    <Item Key="AllowInsecureAuthInProduction">true</Item>
  </Metadata>
  <InputClaims>
    <InputClaim ClaimTypeReferenceId="extension_fido_rawId" PartnerClaimType="id" />
    <InputClaim ClaimTypeReferenceId="clientDataJSON" PartnerClaimType="clientDataJSON" />
    <InputClaim ClaimTypeReferenceId="attestationObject" PartnerClaimType="attestationObject" />
  </InputClaims>
  <OutputClaims>
    <OutputClaim ClaimTypeReferenceId="fido_publicKeyJwk" PartnerClaimType="publicKeyJwk" />
    <OutputClaim ClaimTypeReferenceId="extension_fido_publicKeyJwk1" PartnerClaimType="publicKeyJwk1" />
    <OutputClaim ClaimTypeReferenceId="extension_fido_publicKeyJwk2" PartnerClaimType="publicKeyJwk2" />
  </OutputClaims>
  <UseTechnicalProfileForSessionManagement ReferenceId="SM-Noop" />
</TechnicalProfile>
これは、登録時に Authenticator のデータを送信すると、デコードして公開鍵を返すコード。
ちなみに Attestation は取得しているものの、保存も検証もしていないので悪しからず。
なぜ publicKeyJwk1 と publicKeyJwk2 があるのかというと、先ほど作成した Azure AD の拡張属性に格納できるデータが 245 文字までなので、長い公開鍵は分割しているからw
ちなみに対応する API はこちら。
app.post('/credentials', async (req, res) => {
    try {
        const credential = await fido.makeCredential(req.body);
        const publicKeyJwkStr = JSON.stringify(credential.publicKeyJwk);
        var publicKeyJwk1 = '';
        var publicKeyJwk2 = '';

        if (publicKeyJwkStr.length > 245 )
        {
            publicKeyJwk1 = publicKeyJwkStr.substr(0,245);
            publicKeyJwk2 = publicKeyJwkStr.substr(245);
        }
        else
        {
            publicKeyJwk1 = publicKeyJwkStr;
        }

        res.json({
            publicKeyJwk: publicKeyJwkStr,
            publicKeyJwk1: publicKeyJwk1,
            publicKeyJwk2: publicKeyJwk2
        });
    } catch (e) {
        res.status(409).json({ version: "1.0", status: 409, userMessage: 'ERROR: ' + e.message });
    }
});
直観的ではないが、InputCalim が Azure AD B2C から送信するデータで、OutputClaim が API から返されるデータ。
認証するほうも直しておく。
<TechnicalProfile Id="REST-FIDOAssertion">
  <DisplayName>GET a FIDO Challenge</DisplayName>
  <Protocol Name="Proprietary" Handler="Web.TPEngine.Providers.RestfulProvider, Web.TPEngine, Version=1.0.0.0, Culture=neutral, PublicKeyToken=null" />
  <Metadata>
    <Item Key="ServiceUrl">https://yoursite.azurewebsites.net/assertion</Item>
    <Item Key="AuthenticationType">None</Item>
    <Item Key="SendClaimsIn">Body</Item>
    <!-- Remove in Production-->
    <Item Key="AllowInsecureAuthInProduction">true</Item>
  </Metadata>
  <InputClaims>
    <InputClaim ClaimTypeReferenceId="extension_fido_rawId" PartnerClaimType="id" />
    <InputClaim ClaimTypeReferenceId="clientDataJSON"  />
    <InputClaim ClaimTypeReferenceId="userHandle"  />
    <InputClaim ClaimTypeReferenceId="signature"  />
    <InputClaim ClaimTypeReferenceId="authenticatorData"  />
    <InputClaim ClaimTypeReferenceId="extension_fido_publicKeyJwk1" PartnerClaimType="publicKeyJwk1" />
    <InputClaim ClaimTypeReferenceId="extension_fido_publicKeyJwk2" PartnerClaimType="publicKeyJwk2" DefaultValue="" />
  </InputClaims>
  <UseTechnicalProfileForSessionManagement ReferenceId="SM-Noop" />
</TechnicalProfile>
さっきからちろちろある Remove in Production の警告は、API の認証を無視する設定。
本番環境では、ベーシック認証、できれば 証明書認証で API を保護してください。
API を叩く部分を書いたら、次は step 6.
そろそろ気持ち悪くなってきましたね。ぼくもです。
<OrchestrationStep Order="6" Type="ClaimsExchange">
  <ClaimsExchanges>
    <ClaimsExchange Id="SelfAsserted-Enrollment" TechnicalProfileReferenceId="SelfAsserted-FIDOEnrollment" />
  </ClaimsExchanges>
</OrchestrationStep>
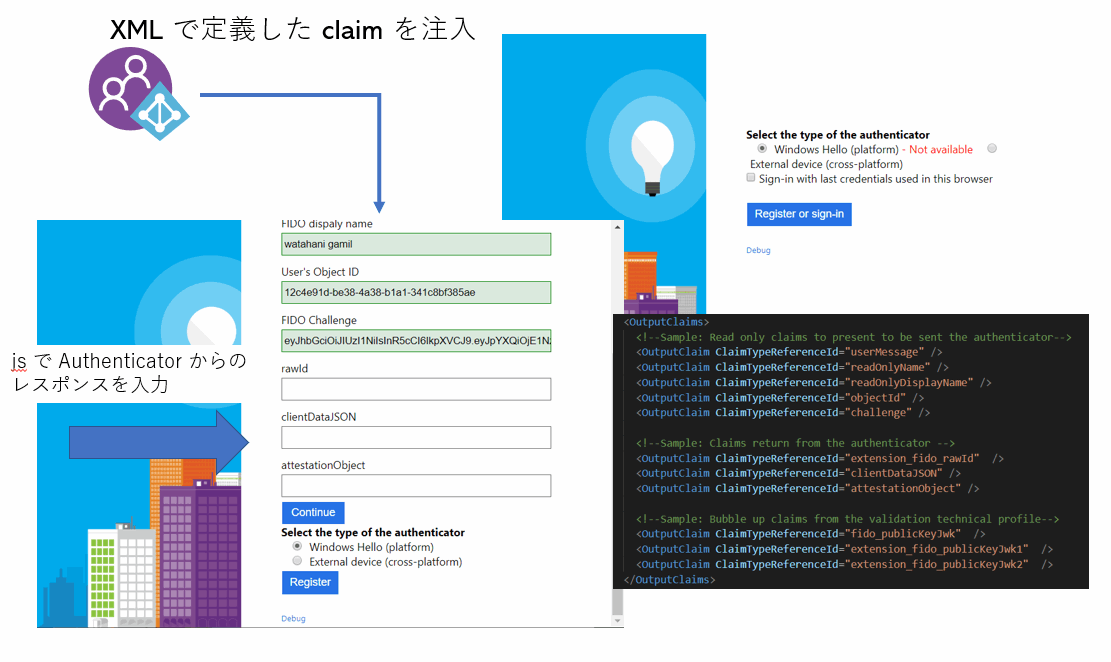
SelfAsserted-FIDOEnrollment を XML で探してみると、さっきと同じ TechnicalProfile タグだけど、
Handler に Handler="Web.TPEngine.Providers.SelfAssertedAttributeProvider, Web.TPEngine, Version=1.0.0.0, Culture=neutral, PublicKeyToken=null" とあるので、これは Web ページを表示する部分ですね!?
さっきと同じく、直観的ではないですが OutputClaim が、外部からの入力、今回はユーザーが入力する項目です。
実際には Web のテンプレートに、OutputClaim と同じ form が追加され、ユーザーの入力を促します。
が、今回は WebAuthn のキーでのサインインなので、js で credentials.create したデータを form にいい感じに突っ込みます。
<TechnicalProfile Id="SelfAsserted-FIDOEnrollment">
  <DisplayName>Welcome to FIDO enrollment</DisplayName>
  <Protocol Name="Proprietary" Handler="Web.TPEngine.Providers.SelfAssertedAttributeProvider, Web.TPEngine, Version=1.0.0.0, Culture=neutral, PublicKeyToken=null"/>
  <Metadata>
    <Item Key="ContentDefinitionReferenceId">api.selfasserted.fido</Item>
  </Metadata>
  <InputClaimsTransformations>
      <InputClaimsTransformation ReferenceId="CopyEmailAddress" />
      <InputClaimsTransformation ReferenceId="CopyDisplayName" />
      <InputClaimsTransformation ReferenceId="FIDOEnrollmentCreateRegistrationMessage" />
  </InputClaimsTransformations>
  <InputClaims>
    <InputClaim ClaimTypeReferenceId="userMessage"/>
    <InputClaim ClaimTypeReferenceId="readOnlyName"/>
    <InputClaim ClaimTypeReferenceId="readOnlyDisplayName"/>
    <InputClaim ClaimTypeReferenceId="objectId"/>
    <InputClaim ClaimTypeReferenceId="challenge"/>
  </InputClaims>
  <OutputClaims>
    <!--Sample: Read only claims to present to be sent the authenticator-->
    <OutputClaim ClaimTypeReferenceId="userMessage" />
    <OutputClaim ClaimTypeReferenceId="readOnlyName" />
    <OutputClaim ClaimTypeReferenceId="readOnlyDisplayName" />
    <OutputClaim ClaimTypeReferenceId="objectId" />
    <OutputClaim ClaimTypeReferenceId="challenge" />

    <!--Sample: Claims return from the authenticator -->
    <OutputClaim ClaimTypeReferenceId="extension_fido_rawId"  />
    <OutputClaim ClaimTypeReferenceId="clientDataJSON" />
    <OutputClaim ClaimTypeReferenceId="attestationObject" />

    <!--Sample: Bubble up claims from the validation technical profile-->
    <OutputClaim ClaimTypeReferenceId="fido_publicKeyJwk"  />
    <OutputClaim ClaimTypeReferenceId="extension_fido_publicKeyJwk1"  />
    <OutputClaim ClaimTypeReferenceId="extension_fido_publicKeyJwk2"  />
  </OutputClaims>
  <ValidationTechnicalProfiles>
      <ValidationTechnicalProfile ReferenceId="REST-FIDOMakeCredential" />
  </ValidationTechnicalProfiles>
  <UseTechnicalProfileForSessionManagement ReferenceId="SM-Noop"/>
</TechnicalProfile>
どうやって突っ込んでるの? ってところは、さっき上げた HTML のテンプレート内を見れば分かる。
XML に突っ込む部分は ContentDefinitionReferenceId の api.selfasserted.fido にある、LoadUri の定義部分を確認。
<!--Sample: FIDO self-asserted HTML page-->
<ContentDefinition Id="api.selfasserted.fido">
  <LoadUri>https://yourtenant.blob.core.windows.net/azure-ad-b2c/fido/self-asserted.html</LoadUri>
  <RecoveryUri>~/common/default_page_error.html</RecoveryUri>
  <DataUri>urn:com:microsoft:aad:b2c:elements:contract:selfasserted:1.1.0</DataUri>
</ContentDefinition>
`
html 内の javascript の当該のコードはこちら。
いつもの credentials.get コマンドの終了後に、HTML のフォームに戻り値を突っ込んでます。
B2C はフォームを返してしか値を取れないのだ…。
function createCredential() {
    console.log("createCredential started");

    if (!PublicKeyCredential || typeof PublicKeyCredential.isUserVerifyingPlatformAuthenticatorAvailable !== "function")
        return Promise.reject("WebAuthn APIs are not available on this user agent.");

    var attachment = $("input[name='attachment']:checked").val();

    var createCredentialOptions = {
        rp: {
            name: "WebAuthn Sample App",
            icon: "https://example.com/rpIcon.png"
        },
        user: {
            id: stringToArrayBuffer($("#objectId").val()),
            name: $("#readOnlyName").val(),
            displayName: $("#readOnlyDisplayName").val(),
            icon: "https://example.com/userIcon.png"
        },
        pubKeyCredParams: [
            {
                //External authenticators support the ES256 algorithm
                type: "public-key",
                alg: -7
            },
            {
                //Windows Hello supports the RS256 algorithm
                type: "public-key",
                alg: -257
            }
        ],
        authenticatorSelection: {
            //Select authenticators that support username-less flows
            requireResidentKey: true,
            //Select authenticators that have a second factor (e.g. PIN, Bio)
            userVerification: "required",
            //Selects between bound or detachable authenticators
            authenticatorAttachment: attachment
        },
        //Since Edge shows UI, it is better to select larger timeout values
        timeout: 50000,
        //an opaque challenge that the authenticator signs over
        challenge:  stringToArrayBuffer($("#challenge").val()),
        //prevent re-registration by specifying existing credentials here
        excludeCredentials: [],
        //specifies whether you need an attestation statement
        attestation: "none"
    };

    return navigator.credentials.create({
        publicKey: createCredentialOptions
    }).then(rawAttestation => {
        $("#extension_fido_rawId").val(base64encode(rawAttestation.rawId));
        $("#clientDataJSON").val(base64encode(rawAttestation.response.clientDataJSON));
        $("#attestationObject").val(base64encode(rawAttestation.response.attestationObject));

        localStorage.setItem("credentialId", $("#extension_fido_rawId").val());
        $("#status").text("Successfully created credential with ID: " + $("#extension_fido_rawId").val());

        if (!isDebug)
            $("#continue").click();
    });
}
と、いうことで、ココの URI をさっき Gist に上げた URI に変更しておく。並びもついでに修正。
<!--Sample: FIDO welcome self-asserted HTML page-->
<ContentDefinition Id="api.selfasserted.fido.welcome">
  <LoadUri>https://gist.githubusercontent.com/watahani/a49bec0c38ad1e2540b829ee4121d8ba/raw/dc5eaa4c36b80459980eae312861fac7339b269c/welcome.html</LoadUri>
  <RecoveryUri>~/common/default_page_error.html</RecoveryUri>
  <DataUri>urn:com:microsoft:aad:b2c:elements:contract:selfasserted:1.1.0</DataUri>
</ContentDefinition>
いよいよアタマが痛くなってきましたが、最後です。
step 7 の AAD-UserWriteFidoUsingObjectId を確認する。
<!--Sample: FIDO enrollment persist data-->
<OrchestrationStep Order="7" Type="ClaimsExchange">
  <ClaimsExchanges>
    <ClaimsExchange Id="AAD-UserWriteFidoUsingObjectId" TechnicalProfileReferenceId="AAD-UserWriteFidoUsingObjectId" />
  </ClaimsExchanges>
</OrchestrationStep>
はい、そろそろ見慣れてきた TechnicalProfile ですが、Protocol がない。
代わりに IncludeTechnicalProfile があるのでそちらを見てみると…
<TechnicalProfile Id="AAD-UserWriteFidoUsingObjectId">
  <Metadata>
    <Item Key="Operation">Write</Item>
    <Item Key="RaiseErrorIfClaimsPrincipalAlreadyExists">false</Item>
    <Item Key="RaiseErrorIfClaimsPrincipalDoesNotExist">true</Item>
  </Metadata>
  <IncludeInSso>false</IncludeInSso>
  <InputClaims>
    <InputClaim ClaimTypeReferenceId="objectId" Required="true"/>
  </InputClaims>
  <PersistedClaims>
    <!-- Required claims -->
    <PersistedClaim ClaimTypeReferenceId="objectId"/>

    <!-- Sample: Writ FIDO claims to the user account -->
    <PersistedClaim ClaimTypeReferenceId="extension_fido_publicKeyJwk1" DefaultValue="" />
    <PersistedClaim ClaimTypeReferenceId="extension_fido_publicKeyJwk2" DefaultValue=""/>
    <PersistedClaim ClaimTypeReferenceId="extension_fido_rawId" DefaultValue=""/>
  </PersistedClaims>
  <IncludeTechnicalProfile ReferenceId="AAD-Common"/>
</TechnicalProfile>
AAD-Common の TechnicalProfile を見ると、先ほど作成したアプリの Object ID と Client ID (アプリケーション ID) を入れるところがある!
そう、ココが拡張属性を書き込むアプリが定義されている部分。
ということで、さっき作成したアプリの Client ID と Object ID を突っ込む。
<TechnicalProfile Id="AAD-Common">
  <DisplayName>Azure Active Directory</DisplayName>
  <!--  Sample: Provide objectId and appId before using extension properties.
        For more information: https://docs.microsoft.com/en-us/azure/active-directory-b2c/active-directory-b2c-create-custom-attributes-profile-edit-custom
        Action required: Insert objectId and appId here -->
  <Metadata>
    <Item Key="ApplicationObjectId">オブジェクト ID</Item>
    <Item Key="ClientId">アプリケーション ID</Item>
  </Metadata>
</TechnicalProfile>
XML の編集は以上で終了。
最後の step 8 はシンプルです。
<OrchestrationStep Order="8" Type="SendClaims" CpimIssuerTechnicalProfileReferenceId="JwtIssuer" />
ここまで集めた Claims を Jwt 形式にして sign してアプリに送信するだけ。
諸々飛ばしたところはありますが、ひとまず XML の作成は完了したので B2C にポリシーをアップしよう。
アップできなければエラーメッセージを確認し、頑張って直してください…。
さて、ここまでやり遂げたあなたなら、先ほどの図も理解できるはずですね。
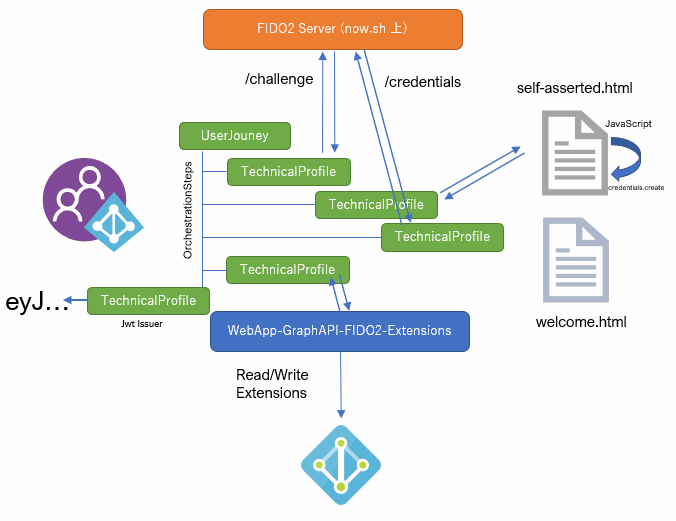
素晴らしい! XML が世界を回していることを実感しますね!?
動作確認
最後に動作確認をして、実際の動きを確かめてみる。
レジストレーション フロー
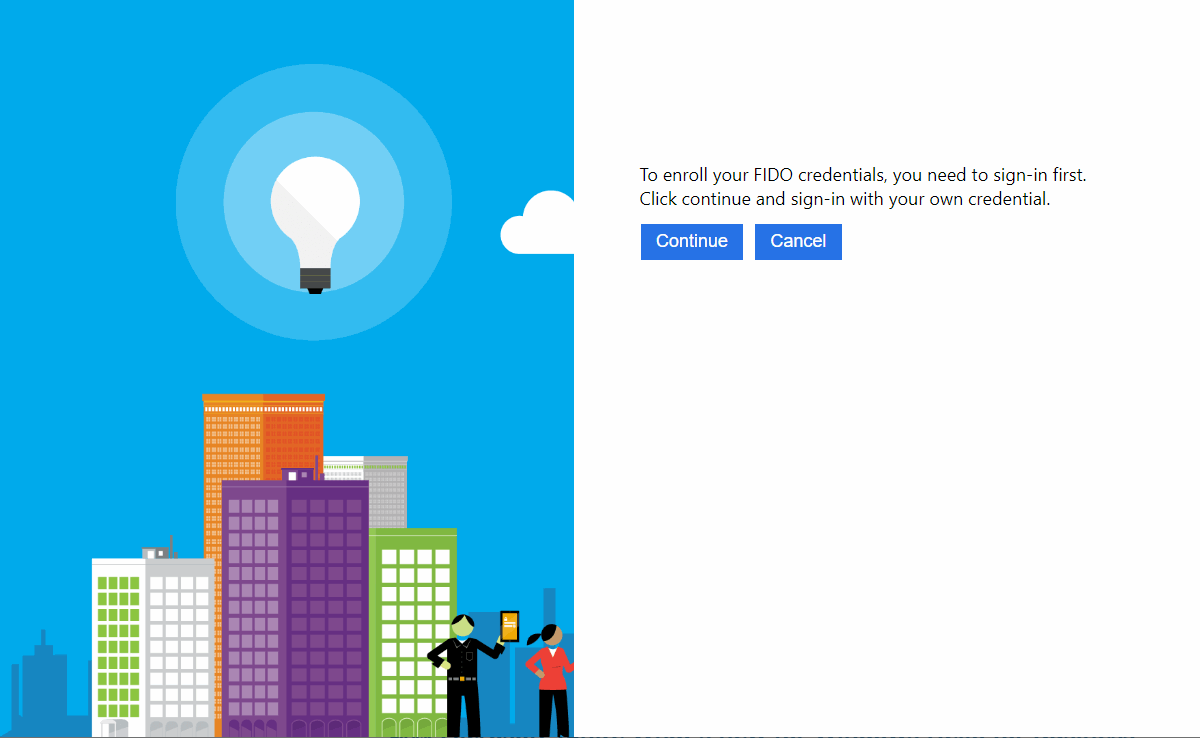
Authenticator の登録には、既存の資格情報 (ここではパスワード) を入力する。
実際に運用するなら、MFA を突破した後のほうがいいけど、これ以上 XML は弄りたくないので。
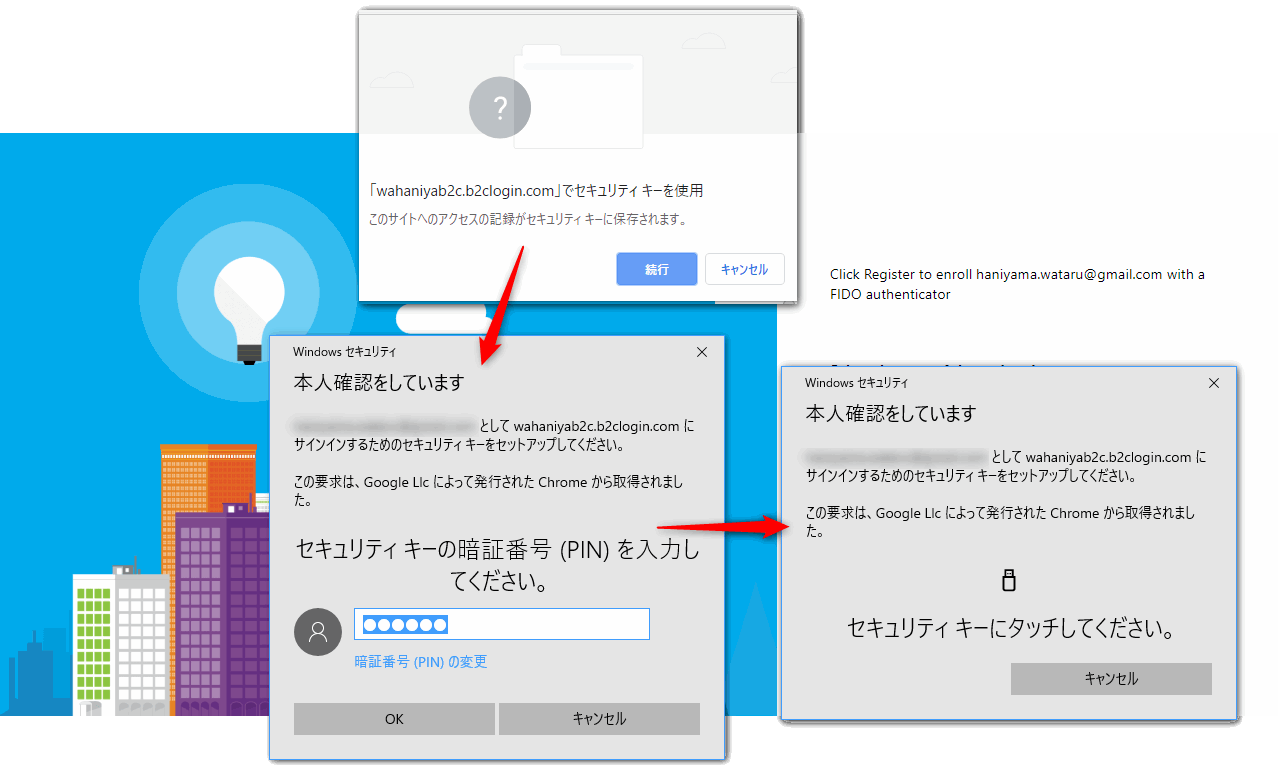
登録の前には、再度資格情報が必要という警告を表示して
資格情報を入れて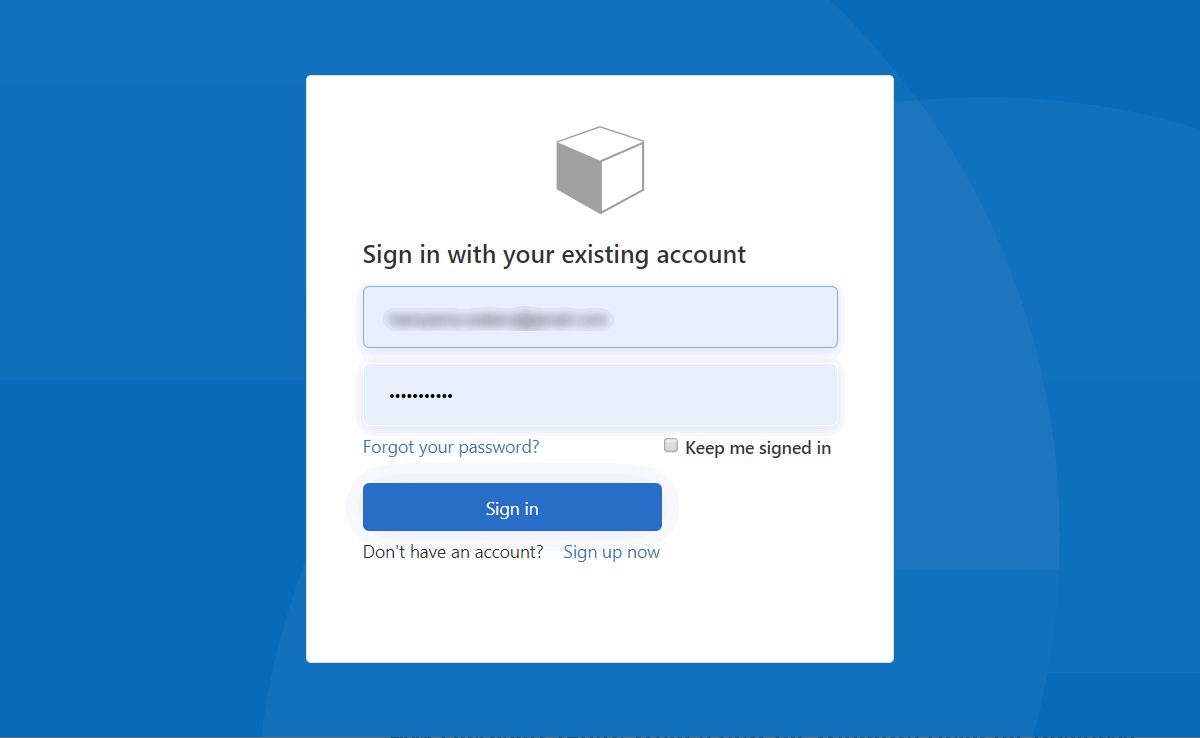
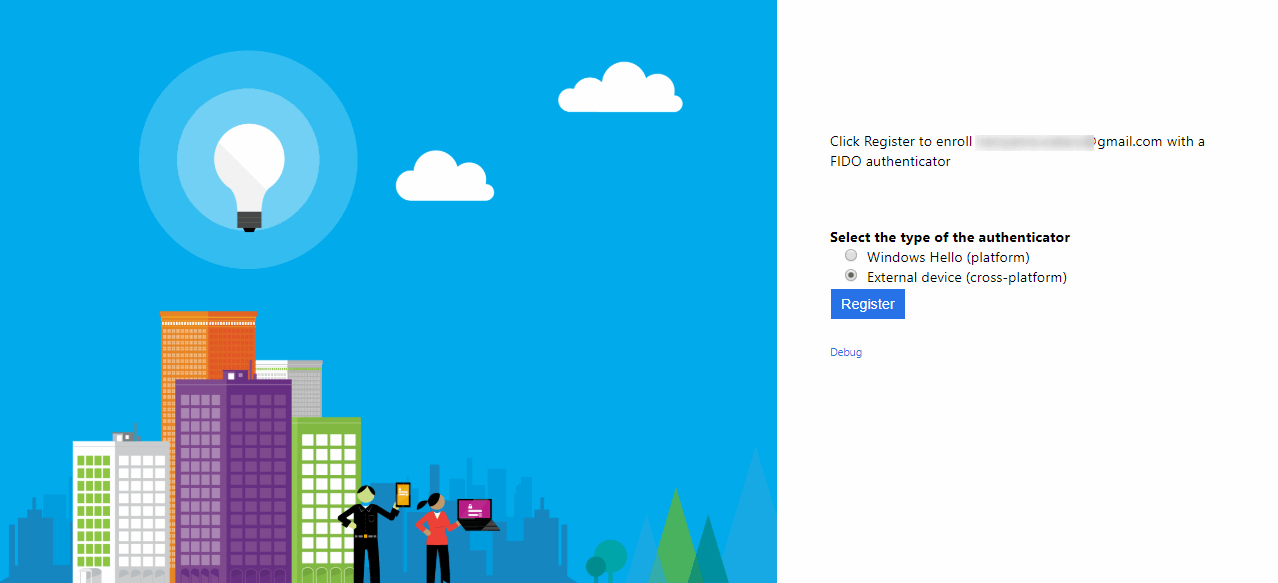
Platform Authenticator か Cross-Platform Authenticator かを選ぶ。
今回は SoloKey を使うので Cross-Platform Authenticator。
Attestation 要求しているので警告がでて、いつもの。
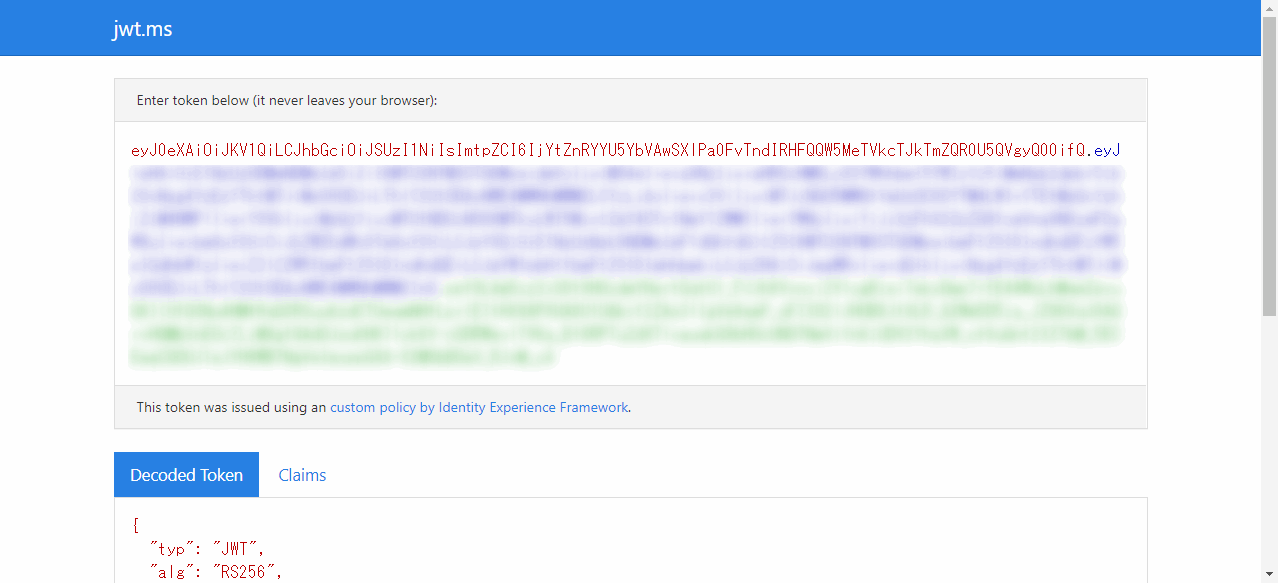
id_token が発行される。
サインイン フロー
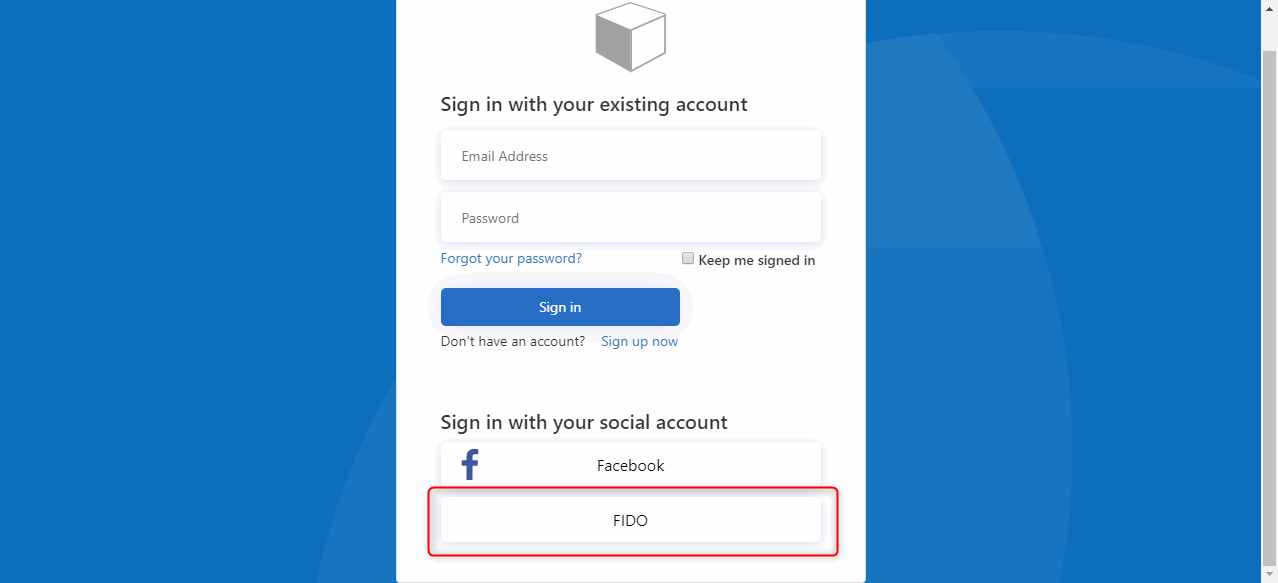
サインインの際は、FIDO ボタンをクリックして
Authenticate ボタンで js が呼ばれて
い つ も の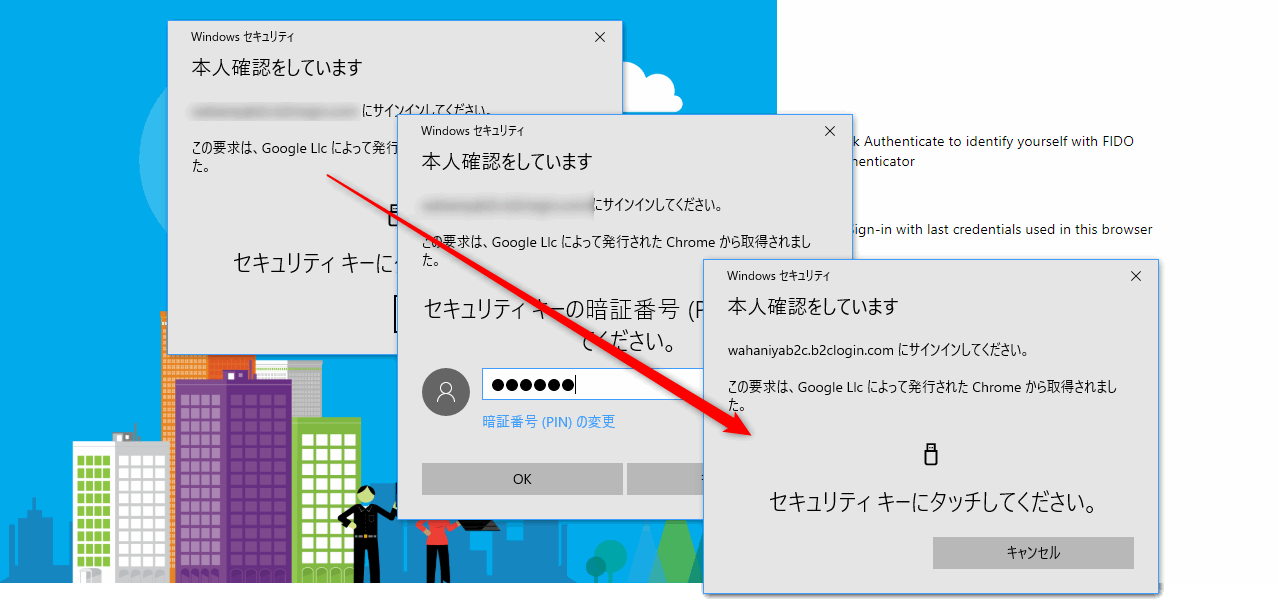
id_token が発行される。
Debug ボタンで hidden 状態の form を表示することができる。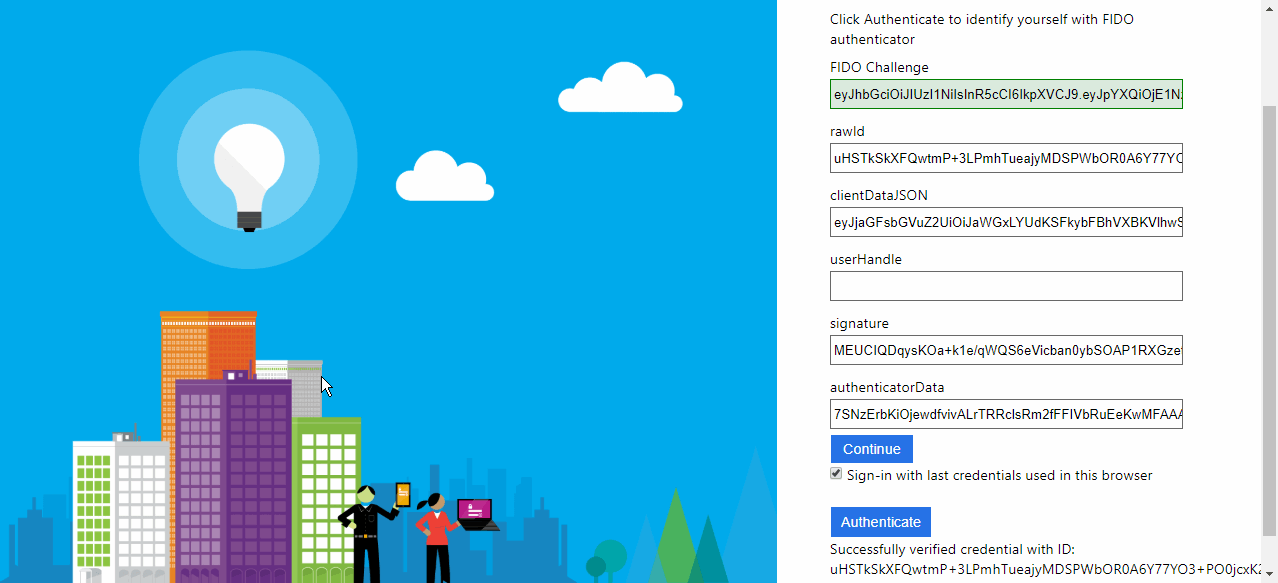
WebAuthn の公開鍵についてはユーザーの拡張属性に保存されている。
なんでか Azure AD B2C テナントは Microsoft Graph API をサポートしていない (使えるけど) ので、Azure AD Graph を叩いて確認する。
サインインしたユーザー情報を取得すると、確かに公開鍵が保存されている。
- Azure AD Graph Explorer
https://graphexplorer.azurewebsites.net/#

まとめ
今回は Azure AD B2C に FIDO2 を組み込むサンプルを動かしてみた。
XML を読み解くのは果てしなくつらい作業だったが、動いているのを見るといとおしく感じてくるから不思議である。
ここまで色々いじれ (てしまえ) る OP は中々なく、XML のつながりを辿るのは果てしなくつらい作業だが、クレームの変換や検証、Azure AD への書き込みや読み込みなど、非常にプリミティブな動作をなんとなく体験できる面白いオモチャなので、興味がある人は触ってみてほしい。
ただ、XML を弄るのは果てしなくつらい作業なので、私はしばらく見たくない。以上。
明日の Advent Calendar は @kishisuke の Sign In with Apple です。
そういえば、誰かが Sign In Apple も Azure AD B2C につないでましたね。